Vue 3 + TypeScript + Vite 搭建项目
Vue 3 + TypeScript + Vite 搭建项目
This template should help get you started developing with Vue 3 and TypeScript in Vite. The template uses Vue 3 <script setup> SFCs, check out the script setup docs to learn more.
Recommended IDE Setup
- VS Code + Volar (and disable Vetur) + TypeScript Vue Plugin (Volar).
Type Support For .vue Imports in TS
TypeScript cannot handle type information for .vue imports by default, so we replace the tsc CLI with vue-tsc for type checking. In editors, we need TypeScript Vue Plugin (Volar) to make the TypeScript language service aware of .vue types.
If the standalone TypeScript plugin doesn't feel fast enough to you, Volar has also implemented a Take Over Mode that is more performant. You can enable it by the following steps:
- Disable the built-in TypeScript Extension
- Run
Extensions: Show Built-in Extensionsfrom VSCode's command palette - Find
TypeScript and JavaScript Language Features, right click and selectDisable (Workspace)
- Run
- Reload the VSCode window by running
Developer: Reload Windowfrom the command palette.
软件架构
- vue: ^3.3.4
- vue-router: ^4.2.4
- pinia: ^2.1.6
- axios: ^1.5.0
- vueuse: ^10.4.1
- sass: ^1.66.1
- nodejs: v18.13.0
- typescript: ^5.0.2
- vite: ^4.4.5
- eslint: ^8.48.0
- prettier: ^3.0.3
- commitizen: 4.2.4
超过此版本的其他版本会造成自定义 scope 没法正常输入,可以在 No scope question error、Fix custom scopes - Add askAnswered to true 这个两个 issue 上了解此问题
- husky: ^8.0.3
安装
yarn install 或 pnpm instal 或 npm install
使用
npm如出现下载不了依赖或是比较慢的时候,可以切换为淘宝镜像npm config set registry http://registry.npm.taobao.org/
使用说明
- 安装完成后会自动执行
package.json里的prepare脚本,此脚本是生成.husky的文件夹 - 执行
package.json里的hooks脚本,此脚本会在.husky目录下生成一个pre-commit脚本文件 - 执行
package.json里的commit-msg脚本,此脚本会在.husky目录下生成一个commit-msg脚本文件,当提交代码时会触发校验提交信息是否符合设定的规范 - 执行
package.json里的dev脚本,启动本地的开发环境
技术特点
使用 Vite 搭建项目
- 使用
vite-cli命令
# pnpm
pnpm create vite

# npm
npm init vite@latest

# yarn
yarn create vite
- 输入项目名
? Project name: » vite-project
- 选择框架(vue)
? Select a framework: » - Use arrow-keys. Return to submit.
- 选择变体(Typescript)
? Select a variant: » - Use arrow-keys. Return to submit.
- 启动项目
cd 项目名 && pnpm install && pnpm run dev
在项目中集成 typescript
- 安装
Typescript环境下能正常使用的Node.js API依赖
pnpm i @types/node -D
- 修改
tsconfig.json
{
	compilerOptions: {
		target: 'ES2020',
		useDefineForClassFields: true,
		module: 'ESNext',
		lib: ['ES2020', 'DOM', 'DOM.Iterable'],
		skipLibCheck: true,

		/* Bundler mode */
		moduleResolution: 'node',
		allowImportingTsExtensions: true,
		resolveJsonModule: true,
		isolatedModules: true,
		noEmit: true,
		jsx: 'preserve',

		/* Linting */
		strict: true,
		noUnusedLocals: true,
		noUnusedParameters: true,
		noFallthroughCasesInSwitch: true,

		baseUrl: './',
		paths: {
				'@': ['src'],
				'@/*': ['src/*'],
		},
	},
	include: ['src/**/*.ts', 'src/**/*.d.ts', 'src/**/*.tsx', 'src/**/*.vue'],
	references: [{ path: './tsconfig.node.json' }],
}
- 修改
vite.config.ts
import { defineConfig, loadEnv } from "vite";
import vue from "@vitejs/plugin-vue";
import * as path from "path";
import viteCompression from "vite-plugin-compression";

// https://vitejs.dev/config/
export default (option: any) => {
  const { mode } = option;
  const env: any = loadEnv(mode, process.cwd());

  return defineConfig({
    plugins: [
      vue(),
      viteCompression({
        verbose: true,
        disable: false,
        threshold: 10240,
        algorithm: "gzip",
        ext: ".gz",
        deleteOriginFile: false,
      }),
    ],
    resolve: {
      // 设置别名
      alias: {
        "@": path.resolve(__dirname, "src"),
      },
    },
    server: {
      // 启动端口
      port: 8080,
      open: true,
      // 设置代理
      proxy: {
        "/api": {
          target: env.VITE_APP_API_URL,
          changeOrigin: true,
          rewrite: (path: string) => path.replace(/^\/api/, ""),
        },
      },
    },
  });
};
在项目中集成 vue-router 和 pinia
- 安装
pnpm i vue-router pinia --save
- 新建
src/router目录并在其下面创建index.ts,导出router
import { createRouter, createWebHistory, RouteRecordRaw } from "vue-router";

const routes: Array<RouteRecordRaw> = [
  {
    path: "/login",
    name: "Login",
    meta: {
      title: "登录",
      keepAlive: true,
      requireAuth: false,
    },
    component: () => import("@/views/login/index.vue"),
  },
  {
    path: "/",
    name: "Home",
    meta: {
      title: "首页",
      keepAlive: true,
      requireAuth: true,
    },
    component: () => import("@/views/home/index.vue"),
  },
];

const router = createRouter({
  history: createWebHistory(),
  routes,
});

export default router;
- 新建
src/store目录并在其下面创建index.ts,导出store
import { createPinia } from "pinia";

const store = createPinia();

export default store;
- 定义模块,新建
src/store/modules目录并在其下面创建user.ts
import { defineStore } from "pinia";

export const useUserStore = defineStore({
  // id 必填,且需要唯一
  id: "user",
  state: () => {
    return {
      name: "Administrator",
    };
  },
  actions: {
    updateName(name: string): void {
      this.name = name;
    },
  },
});
- 在
main.ts中引入router和store并使用
import { createApp } from "vue";
import "@/style.css";
import App from "@/App.vue";
import router from "@/router";
import store from "@/store";

// 创建 vue 实例
const app = createApp(App);

// 挂载路由
app.use(router);

// 挂载 pinia
app.use(store);

app.mount("#app");
- 修改
App.vue
<template>
  <RouterView />
</template>
在项目中集成 axios
- 安装
pnpm i axios --save
- 新建
src/api目录并在其下面创建service.ts
import axios, { AxiosInstance, AxiosRequestConfig, AxiosRequestHeaders, AxiosResponse, AxiosError } from "axios";
import log from "@/utils/log";

/**
 * INFO: 类型“(config: AxiosRequestConfig) => AxiosRequestConfig<any>”的参数不能赋给类型“(value: InternalAxiosRequestConfig<any>) => InternalAxiosRequestConfig<any> | Promise<InternalAxiosRequestConfig<any>>”的参数.
 */
interface AdaptAxiosRequestConfig extends AxiosRequestConfig {
  headers: AxiosRequestHeaders;
}

const baseRequestConfig: AxiosRequestConfig = {
  baseURL: import.meta.env.VITE_APP_API_URL,
  timeout: 15000,
};

// Request interceptors
const service: AxiosInstance = axios.create(baseRequestConfig);

const err = (err: AxiosError): Promise<AxiosError> => {
  if (err.response?.status === 401 || err.response?.status === 504) {
    // INFO: do something, 可清除登录信息及重定向到登录页
  }

  return Promise.reject(err);
};

service.interceptors.request.use((config: AdaptAxiosRequestConfig) => {
  // do something
  if (config.headers) {
    config.headers["Access-Token"] = "Access-Token";
  }

  return config;
}, err);

const handleError = (res: AxiosResponse<any, any>) => {
  // Print to console
  if (import.meta.env.MODE === "development") {
    log.capsule("Error", "UI");
    log.error(res);
  }
  return Promise.reject(res);
};

service.interceptors.response.use((res: AxiosResponse) => {
  // No code will be processed
  if (res.data.code === undefined) {
    return res.data;
  }

  switch (res.data.code) {
    case 0:
      return res.data.data;
    default:
      handleError(res);
      throw new Error();
  }
}, err);

export default service;
- 定义模块,新建
src/api/modules目录并在其下面创建auth目录,按功能创建对应的目录,并在此目录下创建index.ts和types.ts两个文件
// index.ts
import service from "@/api/service";
import { LoginReq } from "./types";

/**
 * 登录
 */
export function login(data: LoginReq): any {
  return service({
    url: "/login",
    method: "post",
    data,
  });
}

// types.ts
interface LoginReq {
  userName: string;
  userPassword: string;
}

interface LoginRes {
  token: string;
}

export type { LoginReq, LoginRes };
在项目中集成 scss
- 安装
pnpm i sass sass-loader -D
- 在
.vue文件中使用
<template>
  <div class="container">home</div>
</template>

<style lang="scss">
$bgColor: #fff;

.container {
  background-color: $bgColor;
}
</style>
在项目中集成 vueuse
- 安装
pnpm i @vueuse/core --save
- 使用方式具体看官网文档 VueUse
在项目中集成 prettier 和 eslint 以规范代码编写习惯
- 安装
prettier
pnpm i prettier -D
- 创建配置文件:
.prettierrc.cjs在
package.json中指定"type": "module"时得使用.prettierrc.cjs
module.exports = {
  // 达到 120 字符换行
  printWidth: 120,
  // 指定每个缩进级别的空格数: 2
  tabWidth: 2,
  // 用制表符而不是空格缩进行
  useTabs: true,
  // 行尾需要有分号
  semi: true,
  // 使用单引号而不是双引号
  singleQuote: true,
  // 仅在需要时在对象属性周围添加引号
  quoteProps: "as-needed",
  // 在 JSX 中使用单引号而不是双引号
  jsxSingleQuote: false,
  // 尽可能在尾随逗号(包括 函数参数和调用)
  trailingComma: "all",
  // 对象字面量中括号之间的空格,如 { foo: bar }
  bracketSpacing: true,
  // 将多行 HTML(HTML、JSX、Vue、Angular)元素的 > 放在最后一行的末尾,而不是单独放在下一行(不适用于自关闭元素)
  bracketSameLine: false,
  // 在唯一的箭头函数参数周围包含括号,如 (x) => x
  arrowParens: "always",
  // 使用默认的折行标准
  proseWrap: "preserve",
  // 指定 HTML、Vue、Angular 和 Handlebars 的全局空白敏感度,遵守 CSS display 属性的默认值
  htmlWhitespaceSensitivity: "css",
  // 换行符使用 lf
  endOfLine: "lf",
};
- 创建忽略文件:
.prettierignore
/src/assets
- 安装
eslint
pnpm i eslint eslint-config-prettier eslint-plugin-prettier eslint-plugin-vue @typescript-eslint/parser @typescript-eslint/eslint-plugin -D
- 创建配置文件:
.eslintrc.cjs在
package.json中指定"type": "module"时得使用.eslintrc.cjs
module.exports = {
  parser: "vue-eslint-parser",
  parserOptions: {
    parser: "@typescript-eslint/parser",
    ecmaVersion: 2020,
    sourceType: "module",
    ecmaFeatures: {
      jsx: true,
    },
  },
  extends: [
    "plugin:vue/vue3-recommended",
    "plugin:@typescript-eslint/recommended",
    "prettier",
    "plugin:prettier/recommended",
  ],
  rules: {
    // override/add rules settings here
    "vue/multi-word-component-names": "off",
    "@typescript-eslint/no-explicit-any": ["off"],
  },
};
- 创建忽略文件:
.eslintignore
node_modules/
dist/
index.html
- 修改
package.json
{
	...
	"scripts": {
		...
		"lint": "eslint src --fix --ext .ts,.tsx,.vue",
		"prettier": "prettier --write \"src/**/*.{vue,ts,tsx}\"",
	}
	...
}
规范化 git 提交信息
- 安装
commitizen
pnpm i commitizen cz-conventional-changelog @commitlint/config-conventional @commitlint/cli commitlint-config-cz cz-customizable -D
- 修改
package.json
{
	...
	"scripts": {
		...
		"commit": "git-cz"
	},
	...
	"config": {
		"commitizen": {
			"path": "node_modules/cz-customizable"
		},
		"cz-customizable": {
			"config": "./cz-config.cjs"
		}
	}
  ...
}
- 创建配置文件:
cz-config.cjs在
package.json中指定"type": "module"时得使用cz-config.cjs
module.exports = {
  types: [
    { value: "feat", name: "Features -- feat: 新增客户管理模块" },
    { value: "fix", name: "Bug Fixes -- fix: 修复登录退出未请求服务端接口" },
    { value: "perf", name: "Performance Improvements -- perf: 提升性能、体验" },
    { value: "revert", name: "Reverts -- revert: 回滚到上一个版本" },
    { value: "docs", name: "Documentation -- docs: 操作说明文档完善补充协议" },
    { value: "style", name: "Styles -- style: 登录页面背景颜色调整至灰白色" },
    { value: "refactor", name: "Code Refactoring -- refactor: 重构数据列表,优化性能" },
    { value: "test", name: "Tests -- test: 登录页面测试环境调试" },
    { value: "build", name: "Build System -- build: 环境变量调整,增加依赖" },
    { value: "ci", name: "Continuous Integration -- ci: 修改k8s, docker的配置信息" },
  ],
  messages: {
    type: "选择提交类型:",
    customScope: "请输入此更改的范围(可选):",
    subject: "请简要描述提交信息(必填):",
    body: '请输入详细描述(可选,使用"|"换行):',
    breaking: '请列举相关重大变更信息(可选,使用"|"换行)',
    footer: "请列举关联issue(可选,例如:#1,#5)",
    confirmCommit: "确认使用以上信息提交",
  },
  allowCustomScopes: true,
  allowBreakingChanges: ["feat", "fix"],
  skipQuestions: [],
  subjectLimit: 100,
};
执行
pnpm commit查看界面效果
示例1 创建配置文件:
commitlint.config.cjs在
package.json中指定"type": "module"时得使用commitlint.config.cjs
module.exports = {
  extends: ["@commitlint/config-conventional", "cz"],
  rules: {
    "type-enum": [
      2,
      "always",
      [
        "feat", // Features -- feat: 新增客户管理模块
        "fix", // Bug Fixes -- fix: 修复登录退出未请求服务端接口
        "perf", // Performance Improvements -- perf: 提升性能、体验
        "revert", // Reverts -- revert: 回滚到上一个版本
        "docs", // Documentation -- docs: 操作说明文档完善补充协议
        "style", // Styles -- style: 登录页面背景颜色调整至灰白色
        "refactor", // Code Refactoring -- refactor: 重构数据列表,优化性能
        "test", // Tests -- test: 登录页面测试环境调试
        "build", // Build System -- build: 环境变量调整,增加依赖
        "ci", // Continuous Integration -- ci: 修改k8s, docker的配置信息
      ],
    ],
    // type 格式固定小写
    "type-case": [2, "always", "lower-case"],
    // type 不能为空
    "type-empty": [2, "never"],
    // scope 格式不启用
    "scope-case": [0],
    // scope 修改范围不能为空
    "scope-empty": [0],
    // subject 不能为空
    "subject-empty": [2, "never"],
    // subject 以什么为结束标志,不启用
    "subject-full-stop": [0],
    // subject 格式,不启用
    "subject-case": [0],
    // 最大长度 100 字符
    "header-max-length": [0, "always", 100],
  },
};
- 安装
husky
pnpm i husky lint-staged -D
- 修改
package.json
{
	...
	"scripts": {
		...
		"prepare": "husky install",
		"hooks": "husky add .husky/pre-commit \"npx --no-install lint-staged\"",
		"commit-msg": "husky add .husky/commit-msg \"npx --no-install commitlint --edit \"$1\"\"",
	},
  ...
	"lint-staged": {
		"*.{js,ts,vue}": [
			"pnpm run lint",
			"pnpm run prettier"
		]
	}
}
执行脚本
pnpm hooks或npx husky add .husky/pre-commit "npx --no-install lint-staged"执行脚本
pnpm commit-msg或npx husky add .husky/commit-msg 'npx --no-install commitlint --edit "$1"'执行脚本
pnpm commit或git commit -m "message"的效果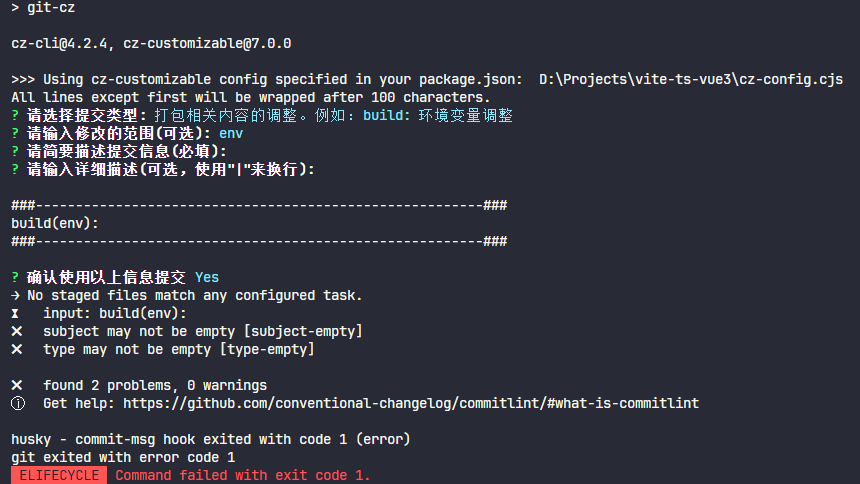
示例2
集成 conventional-changelog 自动生成版本说明
- 安装
conventional-changelog-cli
pnpm i conventional-changelog-cli -D
- 修改
package.json
{
	...
	"scripts": {
		...
		"changelog": "conventional-changelog -p angular -i CHANGELOG.md -s && git add CHANGELOG.md"
	},
	...
}
- 执行
pnpm changelog后在根目录下生成CHANGELOG.md文件