Vue 3 + Vite 搭建项目
Vue 3 + Vite 搭建项目
This template should help get you started developing with Vue 3 in Vite. The template uses Vue 3 <script setup> SFCs, check out the script setup docs to learn more.
Recommended IDE Setup
- VS Code + Volar (and disable Vetur) + TypeScript Vue Plugin (Volar).
软件架构
- vue: ^3.3.4
- vue-router: ^4.2.4
- pinia: ^2.1.6
- axios: ^1.5.0
- vueuse: ^10.4.1
- sass: ^1.66.1
- nodejs: v18.13.0
- vite: ^4.4.5
- eslint: ^8.49.0
- prettier: ^3.0.3
- commitizen: 4.2.4
超过此版本的其他版本会造成自定义 scope 没法正常输入,可以在 No scope question error、Fix custom scopes - Add askAnswered to true 这个两个 issue 上了解此问题
- husky: ^8.0.3
安装
yarn install 或 pnpm instal 或 npm install
使用
npm如出现下载不了依赖或是比较慢的时候,可以切换为淘宝镜像npm config set registry http://registry.npm.taobao.org/
使用说明
- 安装完成后会自动执行
package.json里的prepare脚本,此脚本是生成.husky的文件夹 - 执行
package.json里的hooks脚本,此脚本会在.husky目录下生成一个pre-commit脚本文件 - 执行
package.json里的commit-msg脚本,此脚本会在.husky目录下生成一个commit-msg脚本文件,当提交代码时会触发校验提交信息是否符合设定的规范 - 执行
package.json里的dev脚本,启动本地的开发环境
技术特点
使用 Vite 搭建项目
- 使用
vite-cli命令
# pnpm
pnpm create vite

# npm
npm init vite@latest

# yarn
yarn create vite
- 输入项目名
? Project name: » vite-project
- 选择框架(vue)
? Select a framework: » - Use arrow-keys. Return to submit.
- 选择变体(Javascript)
? Select a variant: » - Use arrow-keys. Return to submit.
- 启动项目
cd 项目名 && pnpm install && pnpm run dev
在项目中集成 vue-router 和 pinia
- 安装
pnpm i vue-router pinia --save
- 新建
src/router目录并在其下面创建index.js,导出router
import { createRouter, createWebHistory } from "vue-router";

const routes = [
  {
    path: "/login",
    name: "Login",
    meta: {
      title: "登录",
      keepAlive: true,
      requireAuth: false,
    },
    component: () => import("@/views/login/index.vue"),
  },
  {
    path: "/",
    name: "Home",
    meta: {
      title: "首页",
      keepAlive: true,
      requireAuth: true,
    },
    component: () => import("@/views/home/index.vue"),
  },
];

const router = createRouter({
  history: createWebHistory(),
  routes,
});

export default router;
- 新建
src/store目录并在其下面创建index.js,导出store
import { createPinia } from "pinia";

const store = createPinia();

export default store;
- 定义模块,新建
src/store/modules目录并在其下面创建user.js
import { defineStore } from "pinia";

export const useUserStore = defineStore({
  // id 必填,且需要唯一
  id: "user",
  state: () => {
    return {
      name: "Administrator",
    };
  },
  actions: {
    updateName(name) {
      this.name = name;
    },
  },
});
- 在
main.js中引入router和store并使用
import { createApp } from "vue";
import "@/style.css";
import App from "@/App.vue";
import router from "@/router";
import store from "@/store";

// 创建 vue 实例
const app = createApp(App);

// 挂载路由
app.use(router);

// 挂载 pinia
app.use(store);

app.mount("#app");
- 修改
App.vue
<template>
  <RouterView />
</template>
在项目中集成 axios
- 安装
pnpm i axios --save
- 新建
src/api目录并在其下面创建service.js
import axios from "axios";
import log from "@/utils/log";

const baseRequestConfig = {
  baseURL: import.meta.env.VITE_APP_API_PREFIX,
  timeout: 15000,
};

// Request interceptors
const service = axios.create(baseRequestConfig);

const err = (err) => {
  if (err.response?.status === 401 || err.response?.status === 504) {
    // INFO: do something, 可清除登录信息及重定向到登录页
  }

  return Promise.reject(err);
};

service.interceptors.request.use((config) => {
  // do something
  if (config.headers) {
    config.headers["Access-Token"] = "Access-Token";
  }

  return config;
}, err);

const handleError = (res) => {
  // Print to console
  if (import.meta.env.MODE === "development") {
    log.capsule("Error", "UI");
    log.error(res);
  }
  return Promise.reject(res);
};

service.interceptors.response.use((res) => {
  // No code will be processed
  if (res.data.code === undefined) {
    return res.data;
  }

  switch (res.data.code) {
    case 0:
      return res.data.data;
    default:
      handleError(res);
      throw new Error();
  }
}, err);

export default service;
- 定义模块,新建
src/api/modules目录并在其下面创建auth.js文件
import service from "@/api/service";

/**
 * 登录
 */
export function login(data) {
  return service({
    url: "/login",
    method: "post",
    data,
  });
}
在项目中集成 scss
- 安装
pnpm i sass sass-loader -D
- 在
.vue文件中使用
<template>
  <div class="container">home</div>
</template>

<style lang="scss">
$bgColor: #fff;

.container {
  background-color: $bgColor;
}
</style>
在项目中集成 vueuse
- 安装
pnpm i @vueuse/core --save
- 使用方式具体看官网文档 VueUse
在项目中集成 prettier 和 eslint 以规范代码编写习惯
- 安装
prettier
pnpm i prettier -D
- 创建配置文件:
.prettierrc.cjs在
package.json中指定"type": "module"时得使用.prettierrc.cjs
module.exports = {
  // 达到 120 字符换行
  printWidth: 120,
  // 指定每个缩进级别的空格数: 2
  tabWidth: 2,
  // 用制表符而不是空格缩进行
  useTabs: true,
  // 行尾需要有分号
  semi: true,
  // 使用单引号而不是双引号
  singleQuote: true,
  // 仅在需要时在对象属性周围添加引号
  quoteProps: "as-needed",
  // 在 JSX 中使用单引号而不是双引号
  jsxSingleQuote: false,
  // 尽可能在尾随逗号(包括 函数参数和调用)
  trailingComma: "all",
  // 对象字面量中括号之间的空格,如 { foo: bar }
  bracketSpacing: true,
  // 将多行 HTML(HTML、JSX、Vue、Angular)元素的 > 放在最后一行的末尾,而不是单独放在下一行(不适用于自关闭元素)
  bracketSameLine: false,
  // 在唯一的箭头函数参数周围包含括号,如 (x) => x
  arrowParens: "always",
  // 使用默认的折行标准
  proseWrap: "preserve",
  // 指定 HTML、Vue、Angular 和 Handlebars 的全局空白敏感度,遵守 CSS display 属性的默认值
  htmlWhitespaceSensitivity: "css",
  // 换行符使用 lf
  endOfLine: "lf",
};
- 创建忽略文件:
.prettierignore
/src/assets
- 安装
eslint
pnpm i eslint eslint-config-prettier eslint-plugin-prettier eslint-plugin-vue -D
- 创建配置文件:
.eslintrc.cjs在
package.json中指定"type": "module"时得使用.eslintrc.cjs
module.exports = {
  parser: "vue-eslint-parser",
  env: {
    browser: true,
    es2021: true,
    node: true,
  },
  extends: ["plugin:vue/vue3-recommended", "prettier", "plugin:prettier/recommended"],
  overrides: [
    {
      env: {
        node: true,
      },
      files: [".eslintrc.{js,cjs}"],
      parserOptions: {
        sourceType: "script",
      },
    },
  ],
  parserOptions: {
    ecmaVersion: "latest",
    sourceType: "module",
    ecmaFeatures: {
      jsx: true,
    },
  },
  plugins: ["vue", "prettier"],
  rules: {
    // override/add rules settings here
    "vue/multi-word-component-names": "off",
  },
};
- 创建忽略文件:
.eslintignore
node_modules/
dist/
index.html
- 修改
package.json
{
	...
	"scripts": {
		...
		"lint": "eslint src --fix --ext .js,.jsx,.vue",
		"prettier": "prettier --write \"src/**/*.{vue,js,jsx}\"",
	}
	...
}
规范化 git 提交信息
- 安装
commitizen
pnpm i commitizen cz-conventional-changelog @commitlint/config-conventional @commitlint/cli commitlint-config-cz cz-customizable -D
- 修改
package.json
{
	...
	"scripts": {
		...
		"commit": "git-cz"
	},
	...
	"config": {
		"commitizen": {
			"path": "node_modules/cz-customizable"
		},
		"cz-customizable": {
			"config": "./cz-config.cjs"
		}
	}
  ...
}
- 创建配置文件:
cz-config.cjs在
package.json中指定"type": "module"时得使用cz-config.cjs
module.exports = {
  types: [
    { value: "feat", name: "Features -- feat: 新增客户管理模块" },
    { value: "fix", name: "Bug Fixes -- fix: 修复登录退出未请求服务端接口" },
    { value: "perf", name: "Performance Improvements -- perf: 提升性能、体验" },
    { value: "revert", name: "Reverts -- revert: 回滚到上一个版本" },
    { value: "docs", name: "Documentation -- docs: 操作说明文档完善补充协议" },
    { value: "style", name: "Styles -- style: 登录页面背景颜色调整至灰白色" },
    { value: "refactor", name: "Code Refactoring -- refactor: 重构数据列表,优化性能" },
    { value: "test", name: "Tests -- test: 登录页面测试环境调试" },
    { value: "build", name: "Build System -- build: 环境变量调整,增加依赖" },
    { value: "ci", name: "Continuous Integration -- ci: 修改k8s, docker的配置信息" },
  ],
  messages: {
    type: "选择提交类型:",
    customScope: "请输入此更改的范围(可选):",
    subject: "请简要描述提交信息(必填):",
    body: '请输入详细描述(可选,使用"|"换行):',
    breaking: '请列举相关重大变更信息(可选,使用"|"换行)',
    footer: "请列举关联issue(可选,例如:#1,#5)",
    confirmCommit: "确认使用以上信息提交",
  },
  allowCustomScopes: true,
  allowBreakingChanges: ["feat", "fix"],
  skipQuestions: [],
  subjectLimit: 100,
};
执行
pnpm commit查看界面效果
示例1 创建配置文件:
commitlint.config.cjs在
package.json中指定"type": "module"时得使用commitlint.config.cjs
module.exports = {
  extends: ["@commitlint/config-conventional", "cz"],
  rules: {
    "type-enum": [
      2,
      "always",
      [
        "feat", // Features -- feat: 新增客户管理模块
        "fix", // Bug Fixes -- fix: 修复登录退出未请求服务端接口
        "perf", // Performance Improvements -- perf: 提升性能、体验
        "revert", // Reverts -- revert: 回滚到上一个版本
        "docs", // Documentation -- docs: 操作说明文档完善补充协议
        "style", // Styles -- style: 登录页面背景颜色调整至灰白色
        "refactor", // Code Refactoring -- refactor: 重构数据列表,优化性能
        "test", // Tests -- test: 登录页面测试环境调试
        "build", // Build System -- build: 环境变量调整,增加依赖
        "ci", // Continuous Integration -- ci: 修改k8s, docker的配置信息
      ],
    ],
    // type 格式固定小写
    "type-case": [2, "always", "lower-case"],
    // type 不能为空
    "type-empty": [2, "never"],
    // scope 格式不启用
    "scope-case": [0],
    // scope 修改范围不能为空
    "scope-empty": [0],
    // subject 不能为空
    "subject-empty": [2, "never"],
    // subject 以什么为结束标志,不启用
    "subject-full-stop": [0],
    // subject 格式,不启用
    "subject-case": [0],
    // 最大长度 100 字符
    "header-max-length": [0, "always", 100],
  },
};
- 安装
husky
pnpm i husky lint-staged -D
- 修改
package.json
{
	...
	"scripts": {
		...
		"prepare": "husky install",
		"hooks": "husky add .husky/pre-commit \"npx --no-install lint-staged\"",
		"commit-msg": "husky add .husky/commit-msg \"npx --no-install commitlint --edit \"$1\"\"",
	},
  ...
	"lint-staged": {
		"*.{js,vue}": [
			"pnpm run lint",
			"pnpm run prettier"
		]
	}
}
执行脚本
pnpm hooks或npx husky add .husky/pre-commit "npx --no-install lint-staged"执行脚本
pnpm commit-msg或npx husky add .husky/commit-msg 'npx --no-install commitlint --edit "$1"'执行脚本
pnpm commit或git commit -m "message"的效果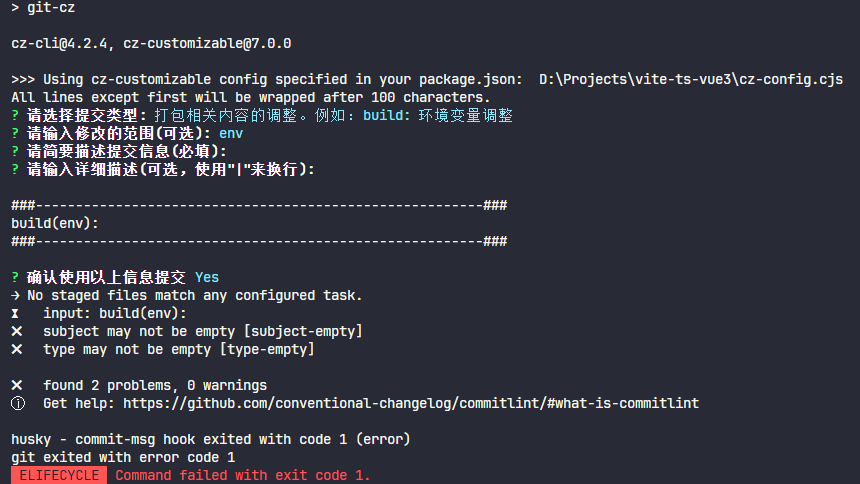
示例2
集成 conventional-changelog 自动生成版本说明
- 安装
conventional-changelog-cli
pnpm i conventional-changelog-cli -D
- 修改
package.json
{
	...
	"scripts": {
		...
		"changelog": "conventional-changelog -p angular -i CHANGELOG.md -s && git add CHANGELOG.md"
	},
	...
}
- 执行
pnpm changelog后在根目录下生成CHANGELOG.md文件